How to Ferment Vegetables at Home (UK Beginner's Guide)
As an Amazon Associate I earn from qualifying purchases. This page contains affiliate links — if you buy through them, I earn a small commission at no extra cost to you.
Trying to ferment vegetables in a UK kitchen can feel like a faff, especially when most guides assume Californian sunshine and soft water. I’m Maya, and after five years of battling hard water, dodging mould, and figuring out what actually works, I’m here to show you how to set up, ferment, and troubleshoot your first batch without the science-lab drama. By the end of this, you’ll be ready to turn those supermarket carrots into something alive, tangy, and utterly delicious. Oh, and before you start, grab the Free Fermentation Starter Checklist – it’s the perfect pre‑flight check for any beginner.
Why is Salt Essential for Fermentation?
Salt is the unsung hero of vegetable fermentation, doing far more than just flavouring your veg. It creates the perfect environment for the ‘good’ bacteria to thrive, making your ferments safe and delicious. In lacto‑fermentation, native lactobacillus on the vegetables feast on sugars and spit out lactic acid, which both preserves the produce and gives it that signature tang. Salt’s role is two‑fold: it suppresses spoilage microbes that love a clean slate, and it draws water out of the veg, forming the brine they need to stay submerged.
Science vs. Myth
- Myth: You need a special starter culture.
- Fact: The surface of a cabbage or carrot already hosts plenty of live cultures – you just need the right conditions.
The honest answer is, UK tap water can throw a spanner in the works. Many local supplies are chlorinated, and the mineral load (hard water) can inhibit the bacteria’s activity, slowing the acid build‑up. A quick boil for 15 minutes, then cooling, strips away most chlorine and softens the water just enough for a reliable start. For more on safe food practices, the Food Standards Agency offers general guidance.
The UK Setup: Water, Salt, and Equipment
Water – the hidden variable
Most beginners assume any water will do. In reality, chlorine levels can stunt fermentation. Boiling the water, then letting it sit for an hour, is the easiest fix. If you have the luxury of time, pour the tap water into a clean jug and leave it uncovered for 24 hours; the chlorine will evaporate naturally, and the water will settle. You can learn more about chlorine in tap water from Water UK.
Salt – pick the right one
Avoid iodised table salt – the anti‑caking agents can interfere with bacterial growth. I stick to fine sea salt (Maldon flakes work well) or Himalayan pink salt, both of which are free from additives. A good rule of thumb is 2 % salt by weight of the vegetables; that’s roughly 20 g of salt for a kilogram of cabbage. Expect to spend around £8–£12 for a decent 500 g bag.
Equipment – what actually works in a British kitchen
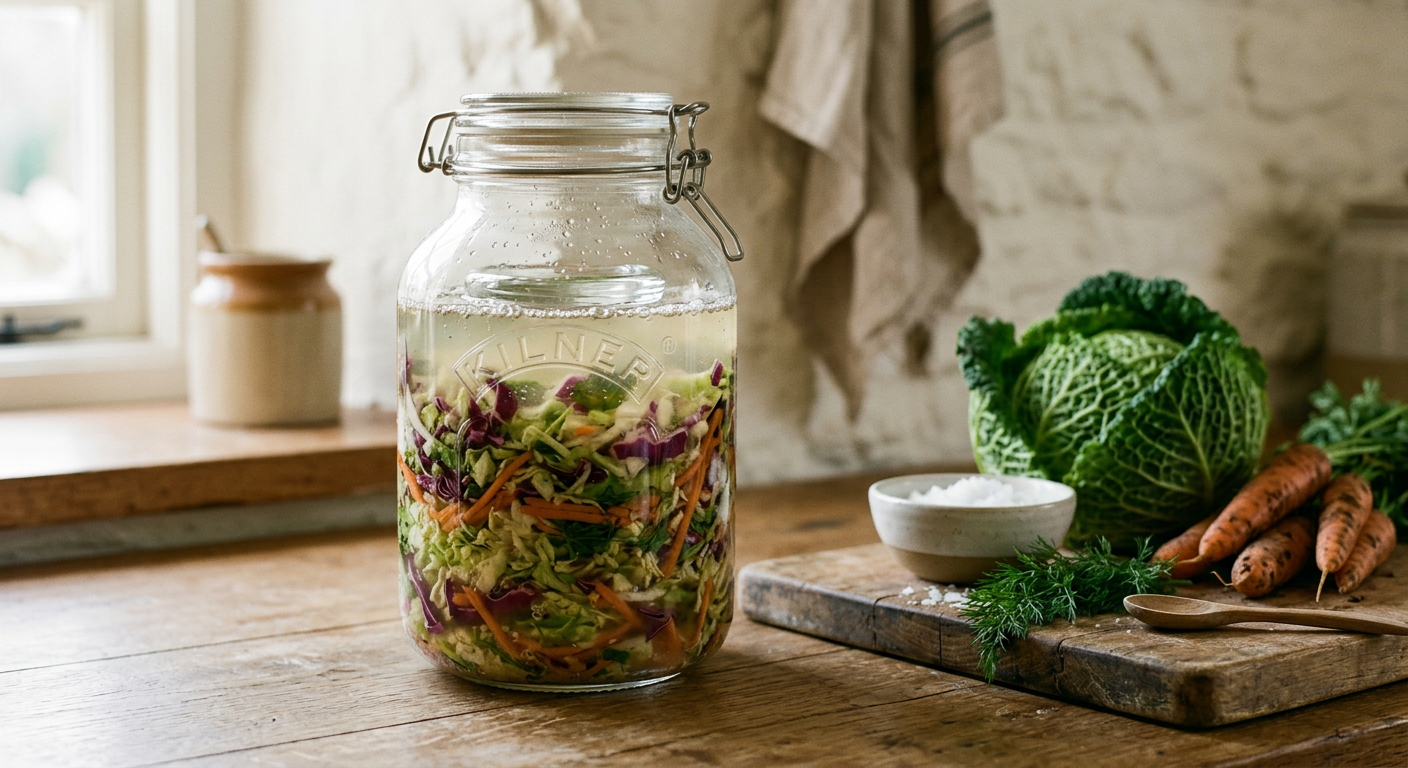
- Kilner Fermentation Jar Set (paid link) – a set of 1.2 L and 2.5 L jars with air‑lock lids. I’ve used these for months; the silicone seal stays tight even when the kitchen is on the blink at 18 °C. Roughly £15–£25 for the pair, and they’re sold at Lakeland, Waitrose, and online.
- Kilner Clip‑Top Jar – handy for storing finished jars in the fridge. The clip seals are easy to open, which is a lifesaver when you’re skimming off Kahm yeast.
- IKEA KORKEN – the honest budget pick for dry storage. It’s cheap (around £5 per jar) but not suited to active fermentation because the lid isn’t airtight enough for the air‑lock system.
If you’re skint, the KORKEN can hold the jars once they’re fermented and chilled, but don’t expect it to keep out air during the active phase. You’ll end up with a bit of a faff trying to keep the brine level right.
The Process: Step‑by‑Step for Beginners
- Prep the veg – Wash, then slice. Thin shreds speed up the brine release; a mandoline is lovely but a sharp chef’s knife does the job just fine.
- Salt & massage – Sprinkle the measured salt over the veg, then massage with clean hands. You’ll feel the veggies soften and start sweating – that’s the brine forming.
- Pack tightly – Transfer the salted veg into your sterilised jar. Press down with a wooden tamper or the back of a butter knife until the liquid rises above the veg. The vegetables must stay under the brine; any exposed surface is a gateway for mould.
- Seal & “bloom” – Fit the air‑lock lid. For the first 3–5 days, you’ll see bubbles and the jar may bulge. That’s the good bacteria doing their thing. If the lid feels tight, give it a gentle “burp” to release excess pressure.
- Store – Keep the jar at a stable 18–22 °C (most UK kitchens hit this range in spring and summer). Fermentation time varies: a quick cucumber pickle may be ready in 5 days, while a robust sauerkraut can sit for 4 weeks.
- Taste & move – Once the flavour is to your liking, pop the jar into the fridge. The cooler temperature slows the activity, preserving the taste for months.
Fermenting vegetables in the UK boils down to three essentials: use non‑iodised sea salt, ensure the water is chlorine‑free (by boiling or standing), and keep the veg fully submerged in a sealed jar at around 20 °C. Follow the simple steps of salting, massaging, packing, and “burping” the jar during the first few days, then let the flavours develop for one to four weeks before refrigerating. This routine works with any common UK veg – cabbage, carrots, cucumbers – and sidesteps the most common pitfalls of mould and off‑flavours.
Now you’ve got the process down, it’s time to check you’ve got the right gear. Download the Free Fermentation Starter Checklist to make sure your water, salt, and jars are all sorted before you crack open that first cabbage.
How to Avoid Common Fermentation Mistakes and Stay Safe
Even with the best intentions, mistakes happen, and knowing how to spot and avoid them is key to safe and delicious ferments. The biggest hurdles often come down to mould, excessive bloating, or simply an off-odour. Always remember that if something seems off, it’s safer to discard the batch rather than risk it.
- Mould – A fuzzy, green or white blanket on the surface means the batch is spoilt. The honest answer is, you can’t safely rescue it – toss it out. I once tried to scoop it off, only to discover the hidden spores had already colonised the brine. Lesson learned: if you see mould, bin it.
- Bloating – The jar swelling is normal; the bacteria are producing carbon‑dioxide. If the pressure becomes excessive, it can pop the lid. A quick “burp” each day during the first week prevents this. Too much salt or overly hard water can also cause slow gas release, leading to a sudden burst later on.
- Scum (Kahm yeast) – A thin, white film on top is harmless and can be skimmed off. It’s a sign the fermentation is progressing, not a failure.
- Off‑odours – If the jar smells like rotten meat or vomit, it’s gone bad. Trust your nose – if it’s off, it’s off, and you should discard it straight away. For general food safety concerns, the NHS website offers advice on food poisoning symptoms.
A quick Red Flag checklist helps:
- Smell: sour and fresh vs. putrid.
- Sight: clear brine, no fuzzy growth.
- Texture: vegetables still crisp, not mushy.
If any of these raise a red flag, the safest move is to dump the batch. It’s a bit of a disappointment, but far better than risking food poisoning.
Seasonal UK Vegetable Guide
Britain’s seasons dictate what’s at peak freshness and cheapest. Here’s a quick cheat‑sheet for everyday cooks:
| Season | Best Veg for Fermenting | Why it works |
|---|---|---|
| Winter | Cabbage, carrots, beetroot, radishes | Root veg hold crunch, store well, and are abundant in supermarkets. |
| Spring | New potatoes, spring onions, kale | Tender textures, bright flavours, and they’re cheap at local greengrocers. |
| Summer | Cucumbers, courgettes, cherry tomatoes | High water content means quicker brine formation. |
| Autumn | Pumpkins, parsnips, turnips | Robust flavours that develop nicely over longer fermentations. |
Keep an eye out for “wonky” veg at the back of the produce aisle – they’re often discounted and perfect for fermenting, reducing waste while adding character to your jars.
Simple Recipes: Sauerkraut and Kimchi
Sauerkraut – the ultimate starter
Ingredients (makes ~2 L):
- 1 kg green or red cabbage, thinly sliced
- 20 g fine sea salt (≈2 % by weight)
Method
- Toss the sliced cabbage with the salt in a large bowl.
- Massage until the cabbage releases about 300 ml of brine.
- Pack tightly into a sterilised Kilner jar, pressing down so the brine covers the veg.
- Seal with the air‑lock lid, “burp” daily for the first 3 days, then store at 18–22 °C.
- Taste after 7 days; if you like the tang, move to the fridge. It’ll keep for months.
Kimchi – a flavourful step up
Ingredients (makes ~2 L):
- 1 kg napa cabbage, quartered
- 1 carrot, julienned
- ½ radish, thinly sliced
- 4 cloves garlic, minced
- 1 tbsp grated ginger
- 2 tbsp UK supermarket chili flakes (the standard red chilli powder works fine)
- 20 g sea salt
Method
- Salt the cabbage and let it sit for 30 minutes, then rinse and squeeze out excess water.
- Combine the carrot, radish, garlic, ginger, and chilli flakes in a bowl; add the salted cabbage and massage until the mixture is sticky and juicy.
- Pack into a Kilner jar, pressing down so the brine reaches the top.
- Seal, “burp” daily for the first 4 days, then store at room temperature for a further week before refrigerating.
Budget alternative – If you can’t find Korean gochugaru, the standard UK chilli flakes are a perfectly acceptable stand‑in. They lack the smoky depth but deliver the heat needed for a proper kimchi kick.
Both recipes are worth their salt for a beginner: sauerkraut proves the basics, while kimchi opens the door to spice and complexity without a trip to an Asian market.
Frequently Asked Questions
Can I use tap water for fermentation?
Yes, you can use tap water for fermentation, but you absolutely need to remove the chlorine first. Boil the water for 15 minutes, let it cool, or leave it uncovered for 24 hours – either method will make it safe for the lactobacilli.
Why is my jar bloating?
Jar bloating is a completely normal sign of active fermentation; it means the bacteria are busy producing carbon-dioxide. A daily “burp” of the lid or using an air‑lock releases the gas and prevents the jar from exploding.
What if I see mold on top?
If you spot fuzzy green or white growth on your ferment, it’s mould, and unfortunately, you must discard the entire batch. A thin, white scum (Kahm yeast) is harmless and can be skimmed off, but anything fuzzy is a red flag.
Do I need a starter culture?
No, you absolutely do not need a special starter culture for most vegetable fermentations. The surface of fresh vegetables already carries plenty of lactobacillus; the right salt and brine give them the conditions to thrive.
Where can I buy fermentation equipment in the UK?
You’ll find Kilner jars and other basic fermentation equipment readily available in the UK at places like Lakeland, Waitrose, and online retailers. The IKEA KORKEN is a cheap alternative for storing finished jars, but not for the active fermentation stage.
Where to Go From Here
You now have the science, the setup, the step‑by‑step, and the safety checklist to turn any veg into a tasty, gut‑friendly jar. The biggest barrier is often just getting started, and that’s where the Free Fermentation Starter Checklist comes in – a printable guide that walks you through water prep, salt ratios, and equipment checks before you even slice the first carrot.
Remember, fermentation isn’t rocket science; it’s a simple partnership between salt, water, and the microbes already living on your produce. Each jar you finish will be a little more confident than the last, and the flavours you’ll discover will make the whole process worth its salt.
If you’ve got any lingering questions, pop them over via our contact page – I’m always happy to help a fellow fermenter troubleshoot. Happy brining!
Explore More Topics
Go deeper on specific topics:
- What is Lacto-Fermentation and How Does it Work?
- Health Benefits of Fermented Vegetables: A UK Perspective
- Fermentation Safety for Beginners: Avoiding Spoilage
- Common Misconceptions About Fermented Foods UK
Sources & Further Reading
- Food Standards Agency - Food Safety and Hygiene
- Water UK - Advice on Chlorine in Tap Water
- NHS - Food Poisoning
As an Amazon Associate I earn from qualifying purchases. The products linked above are ones I would use or recommend on my own camps.
Note: This guide provides general information on fermentation. Always verify specific safety guidelines and food handling practices with a qualified professional or official health authority.