Easy Sauerkraut Recipe UK: Traditional Fermented Cabbage
Craving something tangy and crunchy? Forget the faff. Making your own sauerkraut is genuinely one of the simplest ferments you can tackle in a British kitchen, and you don’t need a science lab or specialist kit. I’ve been there, staring at a jar, wondering if it’s going to turn into a funky delight or a rotten mess. The good news? With just a few UK-sourced ingredients and a simple “set it and forget it” routine, you’ll have a ready-to-eat sauerkraut in two weeks. This guide cuts through the mystery, showing you why the salt works, how to keep the cabbage under the brine, and exactly where to stash your jar for the best results in a typical UK home.
Ready to make sure you don’t miss a step? Grab the Free Fermentation Starter Checklist – it’s a handy one-page cheat sheet that covers the basics, the gear, and the timing, all tailored to UK homes.
Ingredients & Equipment
What you need (and what to avoid)
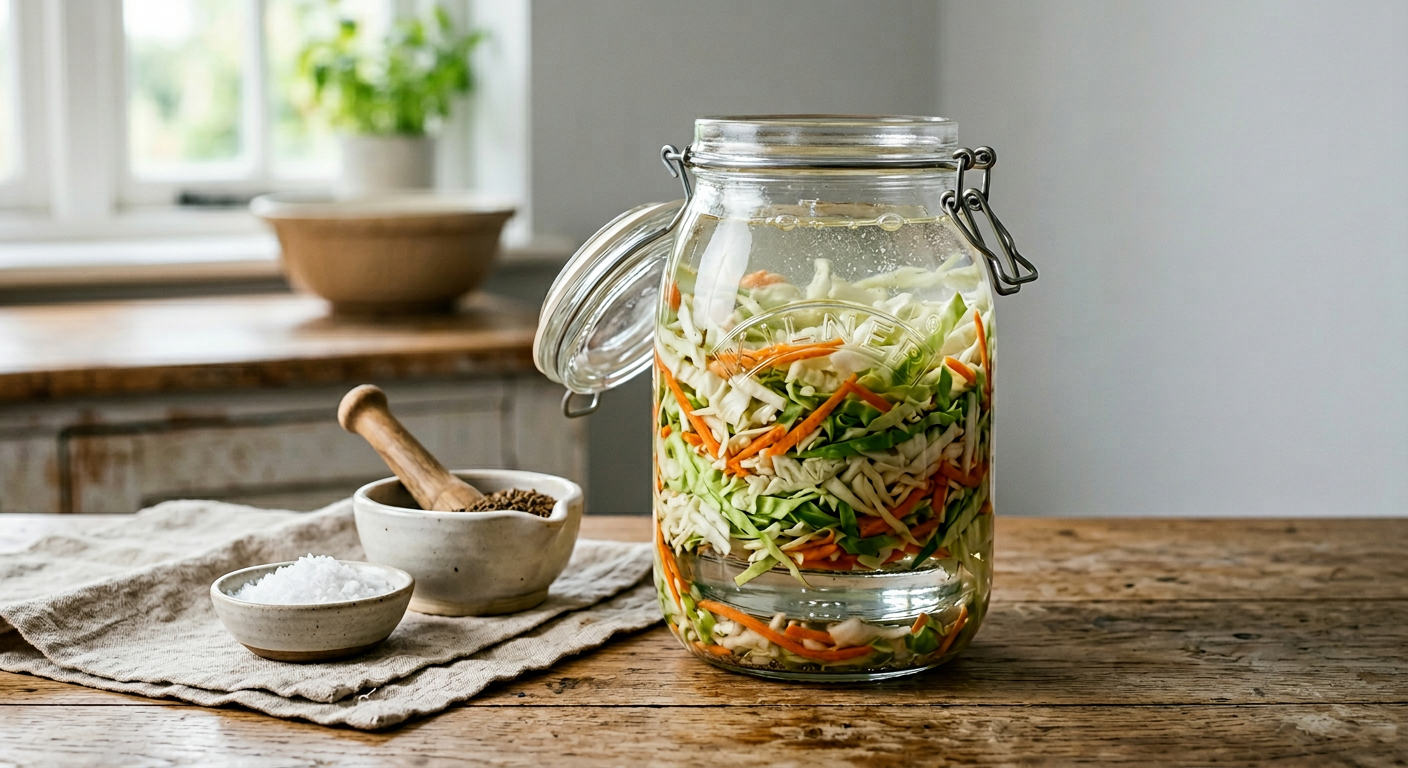
To get started with your homemade sauerkraut, you’ll only need a few basic bits and bobs, most of which you probably already have knocking about in your kitchen cupboards.
- White cabbage – a medium-sized Savoy or green head (about 1.5 kg).
- Non-iodised sea salt – roughly 2% of the cabbage weight, so around 30 g. I swear by Maldon fine flakes; it dissolves quickly and, crucially, it doesn’t contain iodine, which can kill the live cultures.
- Caraway seeds – ½ tsp, optional but traditional for that nutty note.
- Large bowl – any clean kitchen bowl will do.
- Sharp knife or mandoline – a mandoline gives even shreds, but a good chef’s knife works just as well.
- Mason or Kilner jar – a 1-litre jar is perfect for a single head; you can also use a clean jam jar you already have.
- Fermentation weight – a glass weight, a small clean dish-washing bowl, or even a sealed food-grade plastic bag filled with water. I started by using an old jam-jar lid filled with water; it saved me a few quid and works spot on.
Quick tip: Don’t reach for iodised table salt. The iodine will inhibit the lacto-bacterial activity and you’ll end up with soggy cabbage rather than crisp sauerkraut.
If you’re wondering which jar to pick, check out our guide to the Best Fermentation Jars UK – it breaks down the pros of Kilner versus Mason jars and even mentions budget-friendly options.
The Step-by-Step Process
1. Shred the cabbage
Slice the cabbage as thinly as you can – a mandoline gives uniform strips, but a sharp knife works fine. The finer the shred, the quicker the brine forms.
2. Salt & massage
Sprinkle the measured sea salt over the shredded cabbage. Using clean hands, massage the mix for 5–10 minutes. You’ll feel the cabbage soften and release a clear liquid; that’s the brine you need. If it looks dry after the massage, add a pinch more salt and keep going – the cabbage will always surrender some juice.
3. Pack it in
Transfer the salted cabbage into your jar, pressing down firmly with a wooden spoon or your fist. The goal is to eliminate air pockets and get the cabbage under the brine. I once packed a batch loosely, and the top layer turned soggy and mouldy – lesson learned: pack tight.
4. Weight it down
Place your chosen weight on top. The cabbage must stay submerged; any exposed bits will attract mould. I keep a small glass weight (the kind that comes with a mason jar set) in my drawer – cheap and effective.
5. Cover & ferment
Cover the jar with a loose lid or a clean cheesecloth secured with a rubber band. This lets gases escape while keeping insects out. Leave the jar at room temperature (15-20 °C works well in most UK homes).
First 3-Day Checklist:
- Day 1: You’ll see bubbles forming – a good sign of active lacto-bacteria.
- Day 2: Liquid should rise, covering the cabbage completely.
- Day 3: A faint sour smell appears; if you notice a strong, off-putting odour, something’s gone wrong.
For more on safe fermentation practices, see our How to Ferment Safely page.
6. Wait and taste
After 7-14 days, open the jar, taste a small spoonful. If it’s tangy enough for you, move to storage; if you prefer a stronger bite, let it ferment a few days longer.
Where Should I Store My Fermenting Sauerkraut in a UK Home?
The honest answer is: store the jar in a cool, dark spot that stays roughly 15-18 °C. In many British homes that means an airing cupboard away from the boiler or a pantry shelf out of direct sunlight. If your airing cupboard is warm because of a nearby radiator, it’s better to place the jar on the kitchen counter, but out of the oven’s heat range.
Decision tree:
- Cool, dark pantry or cupboard? → Use it.
- Airing cupboard above the boiler? → Skip it; choose a lower cupboard or the fridge.
- No suitable cupboard? → Store on the kitchen counter, covered, and move to the fridge after the first week of bubbling.
Once the bubbling slows (usually after two weeks), pop the jar into the fridge to halt fermentation and extend shelf life.
For a deeper dive into storage tricks, see Fermentation Storage Tips.
Troubleshooting
Mould: White, fuzzy growth is a red flag – toss the batch. A thin, hazy film (known as kahm yeast) is harmless; simply skim it off and continue. I once panicked at a white layer, only to discover it was kahm – a quick spoonful later and the sauerkraut was fine.
Smell: A pleasant sour tang means you’re on track. A rotten-egg or putrid smell signals spoilage – don’t gamble, bin it.
Bloating: If the jar feels tight, give it a gentle “burp” by unscrewing the lid for a few seconds. This releases CO₂ and prevents the jar from cracking.
A common rookie error is not keeping the cabbage fully submerged. I learned this the hard way when a half-exposed piece turned mouldy, ruining the whole batch. Using a weight and packing tightly avoids that faff.
For more pitfalls, swing by Fermentation Mistakes.
Storage & Shelf Life
Once refrigerated, your sauerkraut will stay good for 2–3 months. The flavour mellows over time, but it remains safe as long as you keep a clean, dry spoon handy. If you need to keep it longer, you can freeze it – the texture will soften a touch, but it’s still delicious on a hot winter soup.
When scooping, always use a clean, dry utensil; this prevents unwanted microbes from spoiling the rest of the jar. For serving ideas, check out our Fermented Food Recipes – I love tossing a spoonful into a sandwich or mixing it into a warm bean stew.
Frequently Asked Questions
Can I use red cabbage?
Yes, you absolutely can use red cabbage for sauerkraut, though it ferments a little slower and its vibrant colour might soften to a pinkish hue. The taste will still be great, just expect a slightly different look.
Do I need a special air-lock lid?
No, not at all, especially when you’re just starting out. A standard Mason or Kilner jar with a loose lid, or even a cloth cover secured with a rubber band, works perfectly for beginners. The main thing is to allow gases to escape naturally while keeping your cabbage safely submerged under the brine.
Why is my sauerkraut mushy?
A mushy texture usually points to one of two things: either your cabbage wasn’t shredded finely enough, or it fermented at too high a temperature for too long. Aim for really thin strips and try to keep your jar in a cooler spot, ideally around 15°C.
Is it safe?
Absolutely, making sauerkraut is very safe, provided you stick to a few key rules. The main ones are using non-iodised salt and ensuring your cabbage stays fully submerged under the brine. The lactic acid produced during fermentation creates an environment where harmful bacteria can’t thrive, making it a time-tested method of food preservation. For general food safety guidance, the Food Standards Agency (FSA) offers detailed information.
How much salt should I use?
The most reliable rule of thumb is to use 2% of the cabbage’s weight in non-iodised sea salt. So, for a medium 1.5 kg head of cabbage, you’ll need around 30g of sea salt – that’s roughly two heaped teaspoons. This precise ratio is crucial for both safety and flavour.
Fermentation Timeline Reference
| Day | Activity | Observation |
|---|---|---|
| 1 | Initial Shredding & Salting | Cabbage releases clear liquid, bubbles begin to form |
| 2 | Packing & Weighing | Liquid rises, covering cabbage completely |
| 3 | First Check | Faint sour smell appears; active fermentation is confirmed |
| 7-14 | Tasting & Storage | Taste for desired tanginess, then move to fridge |
| 2 Weeks+ | Fridge Storage | Bubbling slows; flavour mellows over 2-3 months |

Where to Go From Here
You now have a fool-proof, UK-tailored sauerkraut recipe that fits neatly into a busy lifestyle. The whole process is about as simple as chopping veg, sprinkling salt, and letting nature do the work – no fancy equipment, no scientific jargon. If you’re curious about my own fermentation journey, you can read more about me here.
If you’re ready to give it a go, the next logical step is to make sure you’ve got every ingredient, tool, and timing cue covered. Download the Free Fermentation Starter Checklist – it walks you through the prep, the brine, and the storage decisions, so you won’t miss a beat.
Got a lingering question or a quirky batch story? Drop me a line on the contact page – I love hearing about fellow home fermenters and swapping tips. For more fermentation inspiration and recipes, swing by the blog. Happy fermenting, and enjoy that crisp, tangy crunch on toast, in a salad, or as a side to your Sunday roast!
Related Guides
For a complete overview, see our Sauerkraut, Kimchi & Pickles: UK Beginner Recipes.
Sources & Further Reading
- Food Standards Agency (FSA) - Food Preservation
- Real Food Magazine - Traditional Fermentation
- The Royal Horticultural Society (RHS) - Vegetable Growing
Note: This guide provides general information for home fermentation. Always verify specific safety guidelines and storage conditions with a qualified professional or official source.