What is Lacto-Fermentation? (And Why Your Grandmother Didn't Need a Recipe)
Sauerkraut can sit in a jar for months and still taste crisp, tangy and downright delicious. This magic is down to lacto-fermentation, a simple process where salt, time, and friendly microbes transform vegetables. It sounds a bit science-y, but it’s actually incredibly straightforward. By the end of this, you’ll know exactly what’s happening inside your jar, why the right amount of salt matters, and how to keep things safe in a typical British kitchen.
The Science: Meet Your New Best Friend (LAB)
Lacto-fermentation is a natural preservation method where lactic acid bacteria (LAB), found on all fresh vegetables, convert sugars into lactic acid. This process creates an acidic environment that preserves the food and gives it that distinctive tangy flavour. Think of LAB as the good guys at a party – they let the right guests in and show the unwelcome ones the door. When you toss a pinch of salt over shredded cabbage, the salt draws water out of the cells through osmosis. That salty brine becomes a cosy home for LAB, which then get to work munching on the sugars in the veg. As they feast, they excrete lactic acid, which drops the pH and creates an environment where spoilage microbes simply can’t survive.
According to Healthline, lactic acid bacteria are responsible for fermenting the majority of vegetables worldwide. This means that, as long as you give them the right conditions, they’ll do the heavy lifting for you – no fancy starter cultures required. I first saw the magic when my neighbour’s kimchi started bubbling on the kitchen counter; the fizz was just the bacteria at work, not a sign of something going wrong. If you’re curious about who’s behind these recipes, you can read more about my journey here.
Why Does Salt Matter in Lacto-Fermentation?
Salt isn’t just there to make your sauerkraut taste salty – it’s the crucial ingredient that makes the whole preservation process possible. When you add the correct amount of salt to your vegetables, two important things happen to kickstart the fermentation:
- Osmosis – The salt pulls water out of the vegetables, creating a natural brine. This brine is essential because it provides the liquid environment that the LAB need to thrive.
- pH suppression – The brine helps dilute the environment, and as the LAB produce lactic acid, the acidity quickly rises. This spike in acidity kills off unwanted spoilage bacteria, ensuring only the good microbes survive.
If you skimp on the salt, the brine will be too weak, and the vegetables could rot. Too much salt, and the LAB can’t get a foothold, leaving you with a crunchy but flavourless slab. A quick rule of thumb I learned after a batch went mushy: aim for roughly 2% salt by weight of the veg – that’s about one heaped tablespoon per kilogram of cabbage.
The Process: Step-by-Step
- Prep – Wash your veg, slice or shred it, and keep the pieces uniform. I use a simple kitchen knife; a mandoline is nice but not essential.
- Salt – Sprinkle the salt over the veg and massage it with clean hands. You’ll feel the water start to pool; that’s the brine forming.
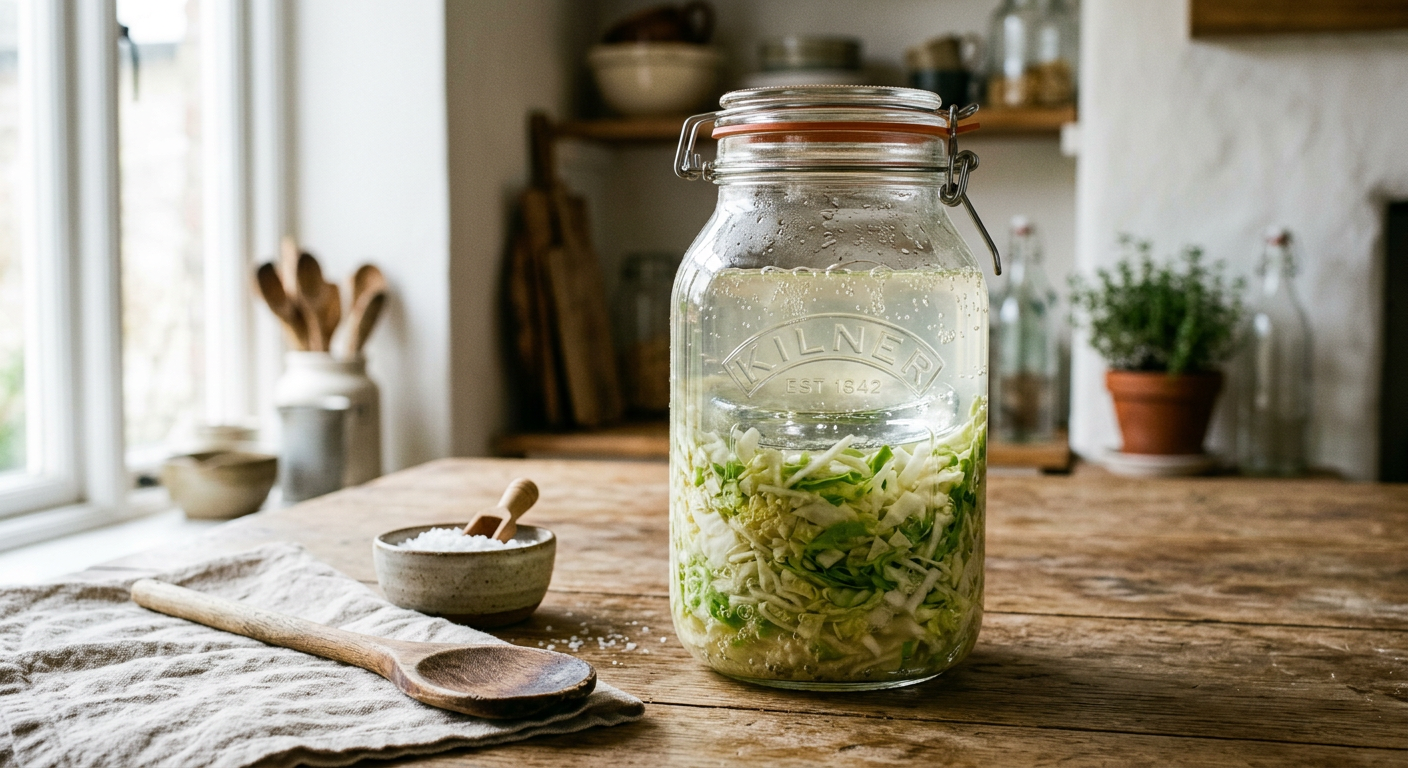
- Pack – Transfer the salted veg into a clean Kilner jar, pressing down firmly with a butter knife so the brine rises above the veggies.
- Weigh – Pop a fermentation weight (or a small, clean glass jar) on top to keep everything under the brine. Oxygen is the enemy; the weight ensures an anaerobic environment.
- Wait – Leave the jar at room temperature (15-20 °C works well in a typical British kitchen) for 1-7 days. Taste daily – when the tang hits the spot, it’s ready.
I once forgot to weigh the cabbage down and spent an afternoon watching a thin film of mould grow on the surface. The lesson? The weight is not a “nice-to-have”, it’s the difference between a clean ferment and a messy one.
UK Context: Water, Jars, and Safety
Water
Tap water in many UK homes is chlorinated, and that chlorine can kill the LAB before they even get a chance to start. The honest answer is, use filtered water or bring the tap water to a gentle boil, let it cool, then use it for your brine. This small step removes the chlorine and any excess hardness that can make the brine cloudy. For more details on water quality in your area, you can often check your local water supplier’s website, such as Thames Water or Severn Trent.
Jars
Kilner jars with their rubber seal are a bit more forgiving than Mason jars with metal lids. The rubber seal creates a tighter seal, reducing the risk of gas escaping and the jar “leaking”. If you do use Mason jars, remember to “burp” them daily – a quick unscrew of the lid lets the CO₂ out and prevents pressure build-up.
Safety
A common worry is “kahm yeast”, a harmless white film that sometimes appears on the surface. It’s a sign that the brine is a little low on acid, but it’s not a health hazard. Real mould – fuzzy, green or black patches – is a different story. If you spot mould on the surface, you can carefully scoop it away and keep fermenting. If mould is submerged in the brine, the batch should be discarded.
According to Wild Pickle, surface mould can usually be removed without ruining the whole jar, but any mould inside the brine indicates spoilage and should be tossed. This guidance gives you a clear line between a “just a bit funky” ferment and a batch that’s gone off. For general food safety advice, the Food Standards Agency (FSA) offers thorough guidance on handling and preparing food safely.
Safety: What to Do If Mold Appears
Mould on a ferment is a bit of a faff, but it doesn’t have to mean disaster. Here’s the quick fix:
- Surface mould – Use a clean spoon to lift the fuzzy patch off, then give the jar a gentle shake to redistribute the brine. The remaining vegetables are still safe, and the LAB will keep working.
- Mould in the brine – This is a red flag. The brine has been compromised, and the harmful spores could have spread. The safest move is to discard the whole batch and start again with fresh salt and filtered water.
The myth that any mould means you must throw the whole jar away is busted. As long as the brine stays clear and the vegetables stay submerged, you’re fine. Remember, the LAB are doing their job by keeping the environment acidic – if they’re thriving, the bad microbes can’t get a foothold.
Frequently Asked Questions
Do I need special equipment?
No, you just need a clean glass jar with a tight-fitting lid and something to keep the veg under the brine – a fermentation weight or a small glass dish works fine. You don’t need anything fancy to get started.
Is it safe?
Yes, lacto-fermentation is very safe, provided you use the correct salt ratio, keep the vegetables submerged under the brine, and use filtered or boiled-then-cooled water to avoid chlorine inhibiting the LAB. Always trust your nose and eyes – if it smells or looks off, bin it.
How long does it take?
It varies a fair bit depending on the vegetable and your kitchen temperature. Most common veg like cabbage will reach a pleasant tang in 3-7 days at around 18 °C, but some tougher roots can take up to two weeks. Taste testing is always the best guide; when it hits the spot for you, it’s ready.
Why is my jar leaking?
Fermentation produces carbon dioxide gas, which builds pressure inside the jar. If the jar is overfilled or sealed too tightly, the gas will push the lid out and cause leaks. Leave a little headspace and “burp” the jar daily by briefly unscrewing the lid to release the pressure.
Can I use tap water?
Ideally not. The chlorine in most UK tap water can inhibit or even kill the beneficial LAB, stopping your ferment before it even gets going. Use filtered water or tap water that has been boiled and then cooled completely to remove the chlorine.
Salt Ratio Reference
| Vegetable Type | Salt Percentage | Approximate Amount |
|---|---|---|
| Cabbage | 2% | 1 heaped tbsp per kg |
| Carrots | 2% | 1 heaped tbsp per kg |
| Radishes | 2% | 1 heaped tbsp per kg |
| Green Beans | 1.5% | 1 heaped tbsp per kg |
| Cauliflower | 2% | 1 heaped tbsp per kg |
| Mixed Veg | 2% | 1 heaped tbsp per kg |

Where to Go From Here
You now have the basics of lacto-fermentation under your belt: salt draws out brine, friendly LAB turn that brine into a tangy, preservative environment, and a few simple steps keep everything safe in a typical British kitchen. The next logical step is to put this knowledge into practice – pick a veg, grab a Kilner jar, and give it a go.
If you’re ready to check that you’ve got the right tools, the right salt ratio, and a solid plan for keeping your jar airtight, download the Free Fermentation Starter Checklist. It walks you through everything you need before you even start chopping. You can also browse more articles on the blog for inspiration.
Happy fermenting, and remember – the honest answer is, you’ll make a few mistakes along the way, but each batch gets you a little closer to mastering the art of lacto-fermentation. Cheers to tasty, home-grown tang!
Related Guides
For a complete overview, see our Complete Guide to UK Vegetable Fermentation for Beginners.
Sources & Further Reading
Healthline - Lactic Acid Bacteria and Fermentation
Wild Pickle - Guidance on mould in ferments
Food Standards Agency (FSA) - Food safety advice
Note: This information is for general guidance only. Always verify details with a qualified professional or official source.