How to Set Up a Fermentation Station at Home (UK Kitchen Guide)
As an Amazon Associate I earn from qualifying purchases. This page contains affiliate links — if you buy through them, I earn a small commission at no extra cost to you.
Setting up a fermentation station in your UK kitchen doesn’t need to be a faff. You’re not after a science lab; you just want a tidy corner where your vegetables stay under the brine and your kitchen stays usable. I’ll show you how to carve out a low-friction space that fits a typical British home, keeps the smells under control, and stops mould from crashing the party.
Download the Free Fermentation Starter Checklist – it’s the quick audit you need before you start moving jars around.
Why You Need a Dedicated Station (and Not Just a Jar)
Putting a few jars on a random shelf works for a one-off batch, but it quickly becomes a safety and hygiene nightmare. Centralising everything gives you temperature control, easy monitoring, and a tidy work surface – all essential for consistent lacto-fermentation. You can find more general advice on fermenting over on the blog.
- Safety: When all your vessels sit in the same spot you can spot a bubbling air-lock or a stray mould spore before it spreads. A single draughty window or a warm oven nearby can raise the temperature a few degrees, encouraging unwanted bacteria. A dedicated station lets you move the whole area away from heat sources or direct sunlight.
- Hygiene: Cross-contamination is easier to avoid when you have a defined clean zone. You can sanitise the surface once and keep it free of raw veg scraps that would otherwise linger on the bench. The Food Standards Agency (FSA) stresses that “clean surfaces and equipment are the first line of defence against foodborne hazards,” and a station makes that line solid.
- Convenience: No more hunting for the right weight or the correct lid. Everything you need – jars, weights, airlocks, labels – is within arm’s reach, cutting the time you spend prepping each batch.
- Aesthetic: A clutter-free countertop looks spot on, and you won’t have to apologise to guests for the pungent aroma wafting from a hidden corner.
Safety tip – If you ever notice a jar near a draughty window or on a damp pantry shelf, pull it back to your station. The honest answer is, a single temperature swing can tip the balance from a happy sour to a spoilage disaster.
The “UK Kitchen” Layout: Where to Put It
British homes often juggle limited counter space, a pantry that’s more cupboard than walk-in, and a garage that can feel like a damp cellar in winter. Picking the right spot is the first step to a mould-free station.
Option A: The Kitchen Worktop (Best for beginners)
A corner of the main worktop, preferably under an overhead cabinet, gives you easy access and visual control. If you need flexibility, a small rolling cart (think IKEA’s RASKOG) can be tucked away when not in use. Aim for a spot that stays around 15–20 °C – the typical UK kitchen temperature – and stays out of direct sunlight.
Option B: The Pantry or Cupboard
A pantry shelf shields the jars from light and can stay cooler, especially if the kitchen gets warm during summer. The downside is you lose the instant visual cue that a worktop provides, so you’ll need to make a habit of checking the airlocks daily.
Option C: Garage or Conservatory (The UK Damp Warning)
Most UK garages are prone to dampness and temperature swings, which are the leading causes of mould. The Met Office data shows that indoor garage temperatures can dip below 5 °C in winter and surge above 25 °C in summer. If you must use this space, invest in an insulated box or a small wine cooler set to 18 °C. A dehumidifier can also help, but it adds cost and another piece of equipment to remember.
Spot-checking checklist for any potential station
| What to assess | Why it matters |
|---|---|
| Temperature – stays between 15–22 °C | Keeps lactic acid production steady |
| Light – low or none | Prevents chlorophyll breakdown and off-flavours |
| Ventilation – no draughts, but some air movement for airlocks | Avoids condensation and mould growth |
| Dampness – no visible moisture on walls or floor | Reduces kahm yeast and mould risk |
I tried the garage once, only to find a stubborn white film on the jar rims after a week. Moving the jars to a kitchen corner saved the batch and my sanity.
Explore the Best Fermentation Equipment
Essential Equipment for Your Station
You don’t need a £300 fermentation fridge, but a few well-chosen tools make the difference between a thriving batch and a disappointment.
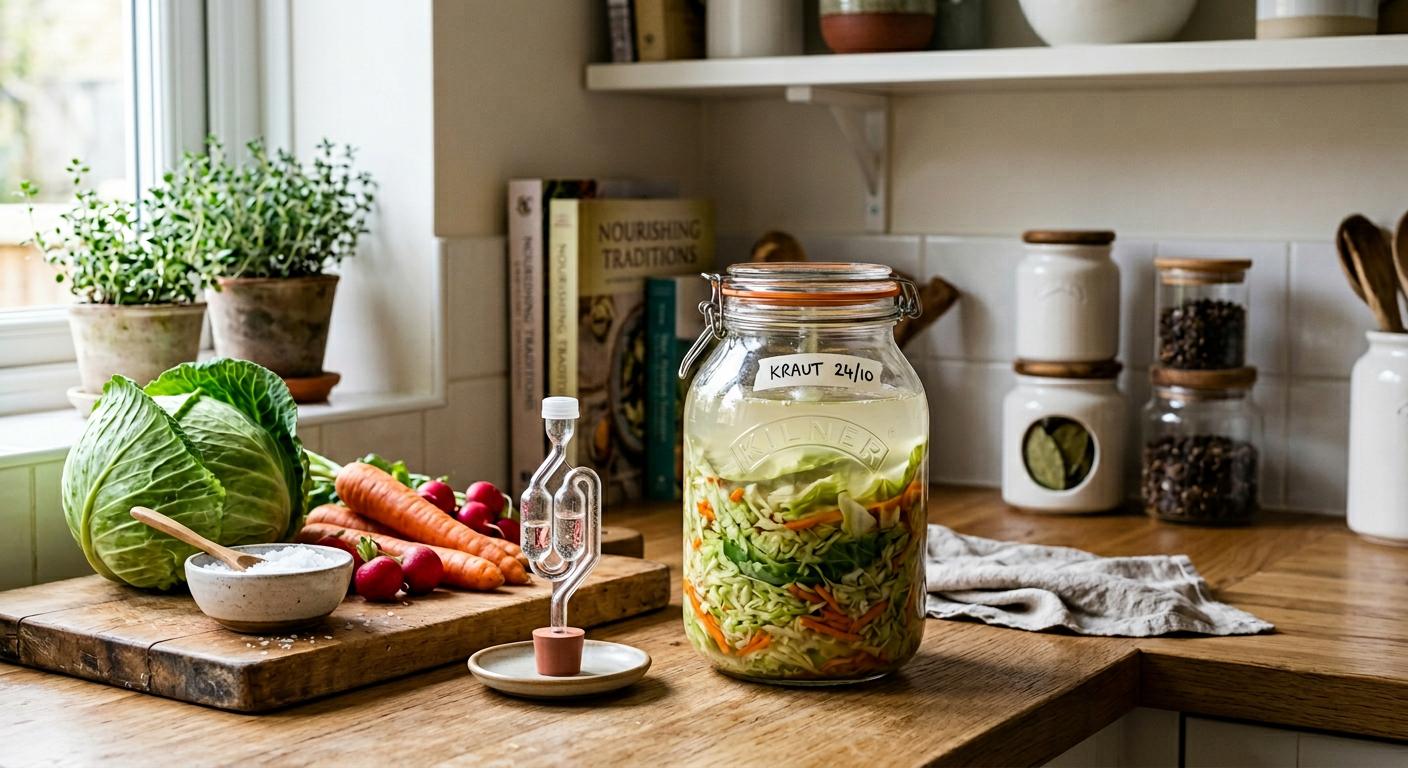
- Jars – The Kilner Fermentation Jar Set (paid link) (roughly £15–£25 for a starter trio) comes with screw-top lids and a built-in airlock, making it worth its salt for beginners. If you prefer a more traditional look, the Weck Tulip Jar (paid link) (around £20–£30 for a pair) uses a glass lid and rubber seal; it looks lovely on a countertop but requires a separate airlock clip.
- Weights – Glass weights keep the veggies snug under the brine. The Masontops Pickle Pebble (paid link) (about £8–£12 per set) is sturdy and sits flat. My budget-friendly fallback is the Fermentology Glass Weights (roughly £5–£7). Budget note: the Fermentology set is the honest budget pick – it does the job but you need to handle them gently; a slip can shatter a weight and ruin a batch.
- Airlocks – The Masontops Pickle Pipe (paid link) (≈ £6) clips onto the lid and releases CO₂ without letting air in. A standard rubber airlock (≈ £4) works too, but the pipe is less fiddly for a busy kitchen.
- Sanitisation – Milton Sterilising Fluid (paid link) (around £8–£10 per litre) is the UK-standard disinfectant. NHS guidance recommends a 1 % solution for food-contact surfaces; it’s cheap, effective and leaves no after-taste.
- Prep Tools – A Borner V-Slicer (≈ £20) makes uniform strips for sauerkraut in seconds. If you’re on a shoestring, an OXO Good Grips mandoline (≈ £25) works, though the blade can be a bit aggressive on softer veg.
- Labels – Simple masking tape and a permanent marker keep track of dates and contents. I once used a permanent-ink stamp; the ink bled into the brine and gave my kimchi an odd taste – stick to the tape.
The single most important thing when setting up a fermentation station is keeping everything under a clean, airtight seal and at a stable temperature. A reliable jar with a good airlock prevents oxygen from entering, which stops mould and unwanted yeasts from taking hold. Pair that with a surface you can sanitise once a week and you’ve removed the two biggest failure points in home lacto-fermentation. All the other equipment – weights, labels, tools – simply support that core principle, making your batches more consistent and your kitchen less chaotic.
Building Your Station: Step-by-Step Setup
Here’s a simple guide to getting your fermentation station up and running without fuss:
- Sanitise everything – Fill a basin with a 1 % Milton solution, submerge jars, lids, weights and tools, then rinse with boiled water. The FSA says this kills any stray bacteria that could out-compete the lactobacilli.
- Prepare the surface – Wipe the chosen countertop or cart with a clean cloth, then dry thoroughly. A dry surface stops accidental water-logging that can encourage mould.
- Arrange the jars – Line them up in a row, larger jars on the bottom, smaller on top. This visual order makes daily checks quick.
- Add weights and airlocks – Drop the glass pebble in until the veg are fully submerged, then seal the lid and clip the airlock or pipe. Make sure the airlock sits snugly; a loose fit lets air in.
- Label each jar – Write the date, veg type and any spice notes on a strip of masking tape, then stick it to the jar’s front. This simple habit saves you from a “what’s this?” moment weeks later.
My Sunday routine now looks like a quick “jar-check” – I’m standing at the station, popping the airlocks to hear the gentle fizz, and noting any colour changes. It takes under ten minutes, and the station stays tidy.
Maintenance and Troubleshooting UK Climate Issues
British weather loves a good swing, and that can throw your ferment off balance. Here’s how to keep things steady with a few practical tips:
- Temperature control – If your kitchen drifts below 15 °C in winter, a small wine cooler (≈ £80–£120) set to 18 °C creates a stable micro-climate. The University of Wisconsin-Madison Extension notes that a consistent 18–22 °C window yields the best lactic acid production without risking spoilage.
- Dampness – In a pantry that feels a touch humid, a portable dehumidifier (around £30–£50) can bring the relative humidity down to a safe 45–55 %. Moisture on the jar rims is a breeding ground for kahm yeast, the harmless but unsightly white film. Scrape it off with a clean spoon; it won’t affect the flavour.
- Mould prevention – Check the airlock daily for any blockages. If you see a fuzzy green or black growth on the jar’s lip, discard the batch – mould can penetrate the brine and isn’t worth the risk. Regularly wipe the jar rims with a Milton-dampened cloth before sealing.
- Odour control – A small kitchen fan or an open window (briefly, after checking the jars) helps vent any strong smells. The airlock’s CO₂ release is subtle, but a closed kitchen can let the aroma build up.
- Kahm yeast tip – A thin white film on the surface is usually kahm yeast, which is harmless but looks ugly. Gently skim it off with a sterile spoon; the brine underneath remains fine.
I once left a jar in my conservatory during a warm spell; the temperature spiked to 26 °C and the brine turned cloudy with a slight off-smell. Moving it to the insulated wine cooler rescued the rest of the batch, and I now keep a spare cooler on standby for summer heatwaves.
Frequently Asked Questions
Do I really need a dedicated station, or can I just use a jar?
A single jar works for a one-off batch, but a dedicated station keeps everything tidy, reduces cross-contamination, and lets you monitor temperature and airlocks at a glance as you scale up your fermenting. It makes the whole process much more reliable.
Can I set up a fermentation station in a garage in the UK?
Generally, no, it’s not recommended. UK garages are often damp and see big temperature swings, which encourages mould and inconsistent fermentation. A kitchen corner or pantry offers much better control; if you absolutely must use a garage, an insulated box and dehumidifier are essential additions.
What is the best equipment for a beginner?
The Kilner Fermentation Jar Set is my personal go-to for beginners. It’s durable, includes an air-lock right in the lid, and fits nicely on a standard worktop without needing extra gadgets. It simplifies the initial setup significantly.
How do I keep vegetables submerged in a jar?
You’ll need glass fermentation weights. I recommend options like the Masontops Pickle Pebble or the more budget-friendly Fermentology Glass Weights. They sit flat on top of your vegetables, keeping them fully submerged under the brine, which is crucial for preventing mould.
How often should I check my fermentation station?
For the first week, I recommend checking daily – listen for the airlock fizz and ensure the lid stays sealed tightly. After that initial period, a quick glance every few days is usually enough, unless you notice any off-colours, unusual smells, or changes in the brine.
Where to Go From Here
A tidy, low-friction station turns fermenting from a chaotic experiment into a reliable part of your weekly routine. By choosing the right spot, equipping it with sturdy jars, weights and airlocks, and keeping an eye on temperature and humidity, you’ll avoid mould, keep the kitchen smelling pleasant and enjoy consistent flavours every time.
Now that you’ve got the blueprint, the next logical step is to audit your own kitchen. Download the Free Fermentation Starter Checklist and see exactly what you need to tweak before you start moving jars around.
If you hit a snag or have a specific question, feel free to get in touch – happy fermenting!
Related Guides
For a complete overview, see our Essential Fermentation Equipment for UK Beginners.
Sources & Further Reading
- Food Standards Agency (FSA) - Food Safety at Home
- NHS - Food Hygiene and Cleaning
- University of Wisconsin-Madison Extension - Fermenting Vegetables Safely
As an Amazon Associate I earn from qualifying purchases. The products linked above are ones I would use or recommend on my own camps.
Note: This article provides general guidance only. Always verify specific safety requirements and fermentation conditions with a qualified professional or official source.